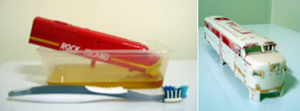
If you have an old locomotive that is looking a bit worn down you should consider repainting it and returning it to its former glory. If it’s your first attempt at painting a locomotive you may want to buy a cheap locomotive on eBay to practice on, I purchased the HO locomotive pictured in this article from eBay for $15.

Disassembly
The body is easily removed by unscrewing two small screws located on each side of the locomotive. This is where the jewellers screwdrivers mentioned on the basic model railroader tool set page come in handy. Next the plastic lights, horns and window are removed by gently prying them out using a small flat head screwdriver. These parts are placed in a small container so they don’t get lost.
Remove the paint
As the body is plastic the best way to remove paint is to use brake fluid. I would recommend wearing gloves for this as brake fluid can be harsh on the skin when exposed for periods of time. Using a toothbrush coat the body with the brake fluid and allow to sit for a few minutes to penetrate the paint. After a couple of coatings the paint will start to flake away, now the toothbrush is used to scrub the body removing the paint. It won’t be possible or necessary to remove all the paint. Rinse the body with plenty of water to remove all the brake fluid then set aside to dry.

Applying the primer
Before applying the primer I used a very fine wet foam abrasive block to get rid of any stubborn paint and help the primer bond to the plastic. Primer was applied in two coats making sure not to apply it too thick as this can cause the primer to run. If you do apply the primer too think don’t stress as it can be sanded smooth when dry. Primer is left to dry for 24 hours before moving onto the next step.
Applying the paint
If you don’t have an airbrush to paint your locomotive you can use modellers aerosol spray cans that are specifically designed to give a smooth coat when painting models. You don’t want to use regular aerosol cans as they don’t spray the paint fine enough for use on a small scale models.
Paint is best applied with a few light coats rather than one thick coat. Allow the paint to dry between each coat for best results. For this locomotive I will be applying 2 colors, firstly the base coat is applied then the section for the secondary color is masked off and then painted.
Always use a good quality masking tape as paint can leak through cheap quality tape. Applying the second color is the most difficult part of the paint process as you have to ensure that the masking tape has been applied correctly and all lines are straight so take your time.
Once again the secondary color was applied using a couple of light coats. Paint is left to dry for 24 hours before slowly removing the masking tape. There was some overspray near the doors were the masking tape wasn’t able to sit flush with the body but i’m not concerned as I will be weathering this locomotive and it will add to the weathered effect.


